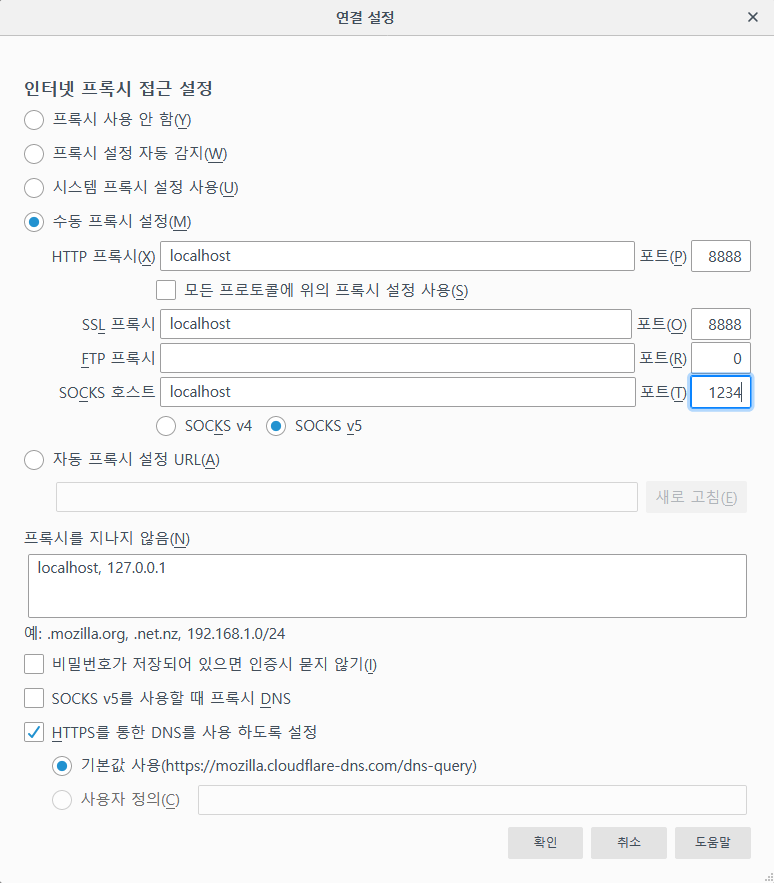
설정 → 일반 → 네트워크설정을 선택하면 나온다.
SSH - 윈디하나의 솔라나라
|
ssh(1)은 SSH 클라이언트다. 기본적으로 필요하다고 생각되는 사항을 소개한다.
ssh [-l 사용자명] [-p 포트번호] 호스트명|사용자명@호스트명 [커맨드]
root@wl ~ # ssh -l userid www.sample.com 1)
호스트 'www.sample.com (xxx.xxx.xxx.xxx)'의 인증을 설정할 수 없습니다..
 RSA 주요 지문은 xx:xx:xx:xx:xx:xx:xx:xx:xx:xx:xx:xx:xx:xx:xx:xx입니다.
연결을 계속하시겠습니까(y/n)? y
경고: 알려진 호스트 목록에 '192.168.0.4'(RSA)을(를) 영구적으로 추가했습니다.
암호:
Sun Microsystems Inc.   SunOS 5.10      Generic January 2005
userid@sample ~ $ exit
root@wl ~ # ssh -l userid www.sample.com uname -r
암호:
5.10 2)
root@wl ~ #
1) 최초 접속시에는 호스트 키의 지문을 확인하는 메시지가 나온다. 호스트 관리자에게 지문을 확인해 일치하는지 확인한 후, 연결을 계속해 저장한다. 만약 기존에 저장된 지문과 지금 저장된 지문이 다르다면 아래와 유사한 메시지가 나온다.
@@@@@@@@@@@@@@@@@@@@@@@@@@@@@@@@@@@@@@@@@@@@@@@@@@@@@@@@@@@
@    경고: 원격 호스트 식별이 변경되었습니다!             @
@@@@@@@@@@@@@@@@@@@@@@@@@@@@@@@@@@@@@@@@@@@@@@@@@@@@@@@@@@@
누군가가 공격을 시도하고 있을 가능성이 있습니다!
지금 엿듣고 있는 사람이 있을 수 있습니다(중간 전달자 공격)!
RSA 호스트 키가 변경되었을 가능성도 있습니다.
원격 호스트에서 보내온 RSA 키의 지문이
xx:xx:xx:xx:xx:xx:xx:xx:xx:xx:xx:xx:xx:xx:xx:xx입니다.
시스템 관리자에게 연락하십시오.
이 메시지를 없애려면 /root/.ssh/known_hosts에 올바른 호스트 키를 추가하십시오.
/root/.ssh/known_hosts에서 키를 거부하고 있습니다:1

RSA 호스트 키(www.sample.com 용)가 변경되었으며  사용자가 엄격한 검사를 요청했습니다.
호스트 키 검증에 실패했습니다.
키를 다시 저장하려면
known_hosts파일을 열어 해당되는 호스트의 키를 저장한 줄을 지우고 다시 접속한다.5.10은
uname -r명령의 결과다.
root@wl ~ # tar cvfz - data | ssh root@wl2 "tar xvfz -"즉 ssh를 이용해 원격에 접속한 후, tar.gz 형식의 데이터를 전송해 압축을 푸는 방법을 사용하면 된다. 단순히 전송하려면 scp(1)를 이용하거나, 원격에서 tar(1)대신 dd(1), cat(1) 명령을 사용할 수 있지만, tar(1) 는 일반적으로 파일의 메타데이터(예를 들면 권한, 날짜, 소유자 정보, 그룹 정보)를 보존하기 때문에 널리 사용되는 방법중 하나다.
aes128-ctr, aes192-ctr, aes256-ctr, arcfour128, arcfour256, arcfour, aes128-cbc, aes192-cbc, aes256-cbc, 3des-cbc, blowfish-cbc 를 사용할 수 있다. CBC은 1976년 IBM이 개발한 블록 암호 운용 방식으로, 데이터를 일정한 길이의 블록으로 나누고 (길이가 모자르면 특정한 규칙에 의해 나머지를 채운다. ISO9797 M1 Padding의 경우 0x00값으로 채운다), 각 블록의 암호는 이전 블록의 암호화된 데이터에 영향을 받는다. (바꿔말하면 블록마다 암호가 모두 다르며, 이전 블록의 데이터가 없으면 현재 블록을 풀 수 없다)root@wl ~ # ssh -C username@sshdserver ...
다음은 솔라리스 11.3에서 로컬호스트에 접속한 디버그 로그를 보여준다.
windy@wl ~ $ ssh -v localhost
Sun_SSH_2.2, SSH protocols 1.5/2.0, OpenSSL 0x1000110f
debug1: Reading configuration data /etc/ssh/ssh_config
debug1: Rhosts Authentication disabled, originating port will not be trusted.
debug1: ssh_connect: needpriv 0
debug1: Connecting to localhost [::1] port 22.
debug1: Connection established.
debug1: ssh_kmf_check_uri: /export/home/windy/.ssh/identity
debug1: Identity file/URI '/export/home/windy/.ssh/identity' pubkey type UNKNOWN
debug1: ssh_kmf_check_uri: /export/home/windy/.ssh/id_rsa
debug1: Identity file/URI '/export/home/windy/.ssh/id_rsa' pubkey type UNKNOWN
debug1: ssh_kmf_check_uri: /export/home/windy/.ssh/id_dsa
debug1: Identity file/URI '/export/home/windy/.ssh/id_dsa' pubkey type UNKNOWN
debug1: Logging to host: localhost
debug1: Local user: windy Remote user: windy
debug1: Remote protocol version 2.0, remote software version Sun_SSH_2.2
debug1: match: Sun_SSH_2.2 pat Sun_SSH_2.*
debug1: Enabling compatibility mode for protocol 2.0
debug1: Local version string SSH-2.0-Sun_SSH_2.2
debug1: use_engine is 'yes'
debug1: pkcs11 engine initialized, now setting it as default for RSA, DSA, and symmetric ciphers
debug1: pkcs11 engine initialization complete
debug1: Creating a global KMF session.
debug1: My KEX proposal before adding the GSS KEX algorithm:
debug1: Failed to acquire GSS-API credentials for any mechanisms (No credentials were supplied, or the credentials were unavailable or inaccessible)
debug1: SSH2_MSG_KEXINIT sent
debug1: SSH2_MSG_KEXINIT received
debug1: My KEX proposal I sent to the peer:
debug1: KEX proposal I received from the peer:
debug1: kex: server->client aes128-ctr hmac-sha2-256 none
debug1: kex: client->server aes128-ctr hmac-sha2-256 none
debug1: Host key algorithm 'ssh-rsa' chosen for the KEX.
debug1: Peer sent proposed langtags, ctos: de-DE,en-US,es-ES,fr-FR,it-IT,ja-JP,ko-KR,pt-BR,zh-CN,zh-TW,i-default
debug1: Peer sent proposed langtags, stoc: de-DE,en-US,es-ES,fr-FR,it-IT,ja-JP,ko-KR,pt-BR,zh-CN,zh-TW,i-default
debug1: We proposed langtags, ctos: ko-KR
debug1: We proposed langtags, stoc: ko-KR
debug1: Negotiated lang: ko-KR
debug1: SSH2_MSG_KEX_DH_GEX_REQUEST sent
debug1: expecting SSH2_MSG_KEX_DH_GEX_GROUP
debug1: Remote: Negotiated main locale: ko_KR.UTF-8
debug1: Remote: Negotiated messages locale: ko_KR.UTF-8
debug1: dh_gen_key: priv key bits set: 259/512
debug1: bits set: 2087/4095
debug1: SSH2_MSG_KEX_DH_GEX_INIT sent
debug1: expecting SSH2_MSG_KEX_DH_GEX_REPLY
debug1: ssh_kmf_key_from_blob: blob length is 277.
The authenticity of host 'localhost (::1)' can't be established.
RSA key fingerprint is bf:34:0d:e3:3e:57:b4:3f:58:ef:0e:98:c6:41:0b:ae.
Are you sure you want to continue connecting (y/n)? y
Warning: Permanently added 'localhost' (RSA) to the list of known hosts.
debug1: bits set: 2127/4095
debug1: ssh_rsa_verify: signature correct
debug1: set_newkeys: setting new keys for 'out' mode
debug1: SSH2_MSG_NEWKEYS sent
debug1: expecting SSH2_MSG_NEWKEYS
debug1: set_newkeys: setting new keys for 'in' mode
debug1: SSH2_MSG_NEWKEYS received
debug1: done: ssh_kex2.
debug1: send SSH2_MSG_SERVICE_REQUEST
debug1: got SSH2_MSG_SERVICE_ACCEPT
debug1: Authentications that can continue: gssapi-keyex,gssapi-with-mic,publickey,password,keyboard-interactive
debug1: Next authentication method: gssapi-keyex
debug1: Next authentication method: gssapi-with-mic
debug1: Failed to acquire GSS-API credentials for any mechanisms (No credentials were supplied, or the credentials were unavailable or inaccessible)
debug1: Next authentication method: publickey
debug1: Trying private key: /export/home/windy/.ssh/identity
debug1: ssh_kmf_check_uri: /export/home/windy/.ssh/identity
debug1: Trying private key: /export/home/windy/.ssh/id_rsa
debug1: ssh_kmf_check_uri: /export/home/windy/.ssh/id_rsa
debug1: Trying private key: /export/home/windy/.ssh/id_dsa
debug1: ssh_kmf_check_uri: /export/home/windy/.ssh/id_dsa
debug1: Next authentication method: keyboard-interactive
Password:
debug1: Authentication succeeded (keyboard-interactive)
debug1: SSH receive window size: 557056 B
debug1: channel 0: new [client-session]
debug1: send channel open 0
debug1: Entering interactive session.
debug1: ssh_session2_setup: id 0
debug1: channel request 0: env
debug1: channel request 0: env
debug1: channel request 0: env
debug1: channel request 0: env
debug1: channel request 0: env
debug1: channel request 0: env
debug1: channel request 0: env
debug1: channel request 0: env
debug1: channel request 0: pty-req
debug1: channel request 0: shell
debug1: fd 4 setting TCP_NODELAY
debug1: channel 0: open confirm rwindow 0 rmax 32768
debug1: Remote: Channel 0 set: LANG=ko_KR.UTF-8
debug1: Remote: Channel 0 set: LC_CTYPE=
debug1: Remote: Channel 0 set: LC_COLLATE=
debug1: Remote: Channel 0 set: LC_TIME=
debug1: Remote: Channel 0 set: LC_NUMERIC=
debug1: Remote: Channel 0 set: LC_MONETARY=
debug1: Remote: Channel 0 set: LC_MESSAGES=
debug1: Remote: Channel 0 set: LC_ALL=
Last login: Thu Mar 21 00:00:00 2019 from 000.000.000.000
다음은 솔라리스 11.4에서 로컬호스트에 접속한 디버그 로그를 보여준다.
windy@wl ~ $ ssh -v localhost
OpenSSH_7.5p1, OpenSSL 1.0.2o  27 Mar 2018
debug1: Reading configuration data /etc/ssh/ssh_config
debug1: Connecting to localhost [::1] port 22.
debug1: Connection established.
debug1: key_load_public: No such file or directory
debug1: identity file /export/home/windy/.ssh/id_rsa type -1
debug1: key_load_public: No such file or directory
debug1: identity file /export/home/windy/.ssh/id_rsa-cert type -1
debug1: key_load_public: No such file or directory
debug1: identity file /export/home/windy/.ssh/id_dsa type -1
debug1: key_load_public: No such file or directory
debug1: identity file /export/home/windy/.ssh/id_dsa-cert type -1
debug1: key_load_public: No such file or directory
debug1: identity file /export/home/windy/.ssh/id_ecdsa type -1
debug1: key_load_public: No such file or directory
debug1: identity file /export/home/windy/.ssh/id_ecdsa-cert type -1
debug1: key_load_public: No such file or directory
debug1: identity file /export/home/windy/.ssh/id_ed25519 type -1
debug1: key_load_public: No such file or directory
debug1: identity file /export/home/windy/.ssh/id_ed25519-cert type -1
debug1: Enabling compatibility mode for protocol 2.0
debug1: Local version string SSH-2.0-OpenSSH_7.5
debug1: Remote protocol version 2.0, remote software version OpenSSH_7.5
debug1: match: OpenSSH_7.5  pat OpenSSH* compat 0x04000000
debug1: Authenticating to localhost:22 as 'windy'
debug1: Unspecified GSS failure.  Minor code may provide more information
No Kerberos credentials available (default cache: FILE:/tmp/volatile-user/100/krb5cc_100)

debug1: Unspecified GSS failure.  Minor code may provide more information
No Kerberos credentials available (default cache: FILE:/tmp/volatile-user/100/krb5cc_100)

debug1: SSH2_MSG_KEXINIT sent
debug1: SSH2_MSG_KEXINIT received
debug1: kex: algorithm: curve25519-sha256
debug1: kex: host key algorithm: ssh-ed25519
debug1: kex: server->client cipher: chacha20-poly1305@openssh.com MAC: <implicit> compression: none
debug1: kex: client->server cipher: chacha20-poly1305@openssh.com MAC: <implicit> compression: none
debug1: expecting SSH2_MSG_KEX_ECDH_REPLY
debug1: Server host key: ssh-ed25519 SHA256:sJg2PiBm/k6ExNAEjDHWHQ4sItZeP9t+WQ7196LTVts
The authenticity of host 'localhost (::1)' can't be established.
ED25519 key fingerprint is SHA256:sJg2PiBm/k6ExNAEjDHWHQ4sItZeP9t+WQ7196LTVts.
Are you sure you want to continue connecting (yes/no)? yes
Warning: Permanently added 'localhost' (ED25519) to the list of known hosts.
debug1: rekey after 134217728 blocks
debug1: SSH2_MSG_NEWKEYS sent
debug1: expecting SSH2_MSG_NEWKEYS
debug1: SSH2_MSG_NEWKEYS received
debug1: rekey after 134217728 blocks
debug1: SSH2_MSG_EXT_INFO received
debug1: kex_input_ext_info: server-sig-algs=<ssh-ed25519,ssh-rsa,rsa-sha2-256,rsa-sha2-512,ssh-dss,ecdsa-sha2-nistp256,ecdsa-sha2-nistp384,ecdsa-sha2-nistp521,null>
debug1: SSH2_MSG_SERVICE_ACCEPT received
debug1: Authentications that can continue: publickey,gssapi-keyex,gssapi-with-mic,password,keyboard-interactive
debug1: Next authentication method: gssapi-keyex
debug1: No valid Key exchange context
debug1: Next authentication method: gssapi-with-mic
debug1: Unspecified GSS failure.  Minor code may provide more information
No Kerberos credentials available (default cache: FILE:/tmp/volatile-user/100/krb5cc_100)

debug1: Unspecified GSS failure.  Minor code may provide more information
No Kerberos credentials available (default cache: FILE:/tmp/volatile-user/100/krb5cc_100)

debug1: Next authentication method: publickey
debug1: Trying private key: /export/home/windy/.ssh/id_rsa
debug1: Trying private key: /export/home/windy/.ssh/id_dsa
debug1: Trying private key: /export/home/windy/.ssh/id_ecdsa
debug1: Trying private key: /export/home/windy/.ssh/id_ed25519
debug1: Next authentication method: keyboard-interactive
Password:
debug1: Authentication succeeded (keyboard-interactive).
Authenticated to localhost ([::1]:22).
debug1: channel 0: new [client-session]
debug1: Requesting no-more-sessions@openssh.com
debug1: Entering interactive session.
debug1: pledge: network
debug1: client_input_global_request: rtype hostkeys-00@openssh.com want_reply 0
debug1: Sending environment.
Last login: Sun XXX  0 00:00:00 0000 from ::1
ssh의 디버그 레벨은 3까지 있는데, 위 화면은 레벨 1까지만 활성화 시켰다. -vvv 옵션을 주면 모든 디버그 로그가 활성화 된다.
/etc/hosts파일에, 클라이언트의 IP를 등록해보고 다시 접속해본다.SSHD 는 운영체제 설치시 이미 설치되어있고 정상적으로 사용 가능할 것이기 때문에 설치에 대한 사항은 생략한다. 몇가지 유용한 설정에 대해 설명한다.
/etc/ssh/sshd_config에서 PermitRootLogin이
no로 되어있는 것을
yes로 수정한 후, sshd 를 재시작한다.
root@wl ~ # vi /etc/ssh/sshd_config
PermitRootLogin yes
root@wl ~ # svcadm restart ssh
PermitRootLogin 에 사용할 수 있는 옵션은 아래와 같이 4가지다. 자세한 사항은 sshd_config(4)를 확인해보자.
공개키를 이용한 인증만 사용하고, ssh 에 인자로써 command 가 있어야 한다. (즉 로그인은 안된다)
/etc/ssh/sshd_config 을 수정하고 sshd를 다시 시작하면 된다.
root@wl ~ # vi /etc/ssh/sshd_config
Port 222
root@wl ~ # svcadm restart ssh
/lib/svc/method/sshd -c명령을 사용해 다시 생성할 수 있다.
root@wl ~ # cd /etc/ssh
root@wl /etc/ssh # rm ssh_host_*
root@wl /etc/ssh # cd /lib/svc/method
root@wl /lib/svc/method # ./sshd -c
Creating new rsa public/private host key pair
Creating new dsa public/private host key pair
root@wl /lib/svc/method #  ssh-keygen -l -f /etc/ssh/ssh_host_rsa_key.pub
1024 68:4e:81:b9:a8:7d:66:a4:8f:47:a8:2e:26:25:60:62 /etc/ssh/ssh_host_rsa_key.pub
root@wl /lib/svc/method # svcadm restart ssh
Timeout, your session not responding.메시지를 전달하고 접속을 끊는다. 필자는 이런 형태의 세팅을 권장하지는 않는다.
root@wl ~ # vi /etc/ssh/sshd_config
ClientAliveCountMax=0
ClientAliveInterval=10
설정하기 전에 아래와 같이 테스트해볼 수 있다.
root@wl ~ # ./sshd -d -o ClientAliveCountMax=0 -o ClientAliveInterval=10 -p 222아래는 다른 세션에서 작업한다.
root@wl ~ # ssh localhost -p 222
...
로그인후 10초간 기다린다.
root@wl ~ # Received disconnect from 127.0.0.1: 2: Timeout, your session not responding.
ServerAliveCountMax, ServerAliveInterval옵션을 주어 실행해 세션이 유휴세션이 되지 않도록 하는 방법이 있다. ssh -o ServerAliveCountMax=0 -o ServerAliveInterval=10와 같은 형식으로 실행하면 된다.scp [SSH옵션들] [-pqr] [[사용자명@]호스트명:]파일명1 [...] [[사용자명@]호스트명:]파일명2
root@wl ~ # mkfile 10m
root@wl ~ # scp 10m wl2:/root
암호:
10m                  100% |*****************************| 10240 KB    00:02
root@wl ~ #
PASV, PORT명령이 없어 별도의 데이터 커넥션을 사용하지 않아, 방화벽이나 NAT 으로 인한 접속 불가 문제를 방지할 수 있다. 하지만 이러한 특성 때문에 수천, 수만명이 접속해 파일을 전송받기에는 부족하다.커맨드 형식은 아래와 같다.
sftp [[user@]host[:file [file]]]
sftp [[user@]host[:dir[/]]]
root@wl ~ # sftp 사용자명@호스트명
암호:
sftp> ?
사용할 수 있는 명령:
cd 경로                       원격 디렉토리를 '경로'로 변경
lcd 경로                      로컬 디렉토리를 '경로'로 변경
chgrp 그룹 경로               '경로' 파일 그룹을 '그룹'으로 변경
chmod 모드 경로               '경로' 파일의 권한을 '모드'로 변경
chown 소유 경로               '경로' 파일의 소유자를 '소유자'로 변경
help                          해당 도움말 텍스트 표시
get 원격 경로 [로컬 경로]     파일 다운로드
lls [ls 옵션 [경로]]          로컬 디렉토리 목록 표시
ln 이전 경로 새 경로          원격 파일 Symlink
lmkdir 경로                   로컬 디렉토리 만들기
lpwd                          로컬 작업 디렉토리 인쇄
ls [경로]                     원격 디렉토리 목록 표시
lumask umask                  로컬 umask를 'umask'로 설정
mkdir 경로                    원격 디렉토리 만들기
put 로컬 경로 [원격 경로]     파일 업로드
pwd                           원격 작업 디렉토리 표시
exit                          sftp 종료
quit                          sftp 종료
rename 이전 경로 새 경로      원격 파일 이름 재지정
rmdir 경로                    원격 디렉토리 제거
rm 경로                       원격 파일 삭제
symlink 이전 경로 새 경로     원격 파일 Symlink
version                       SFTP 버전 표시
!명령                         로컬 쉘에서 '명령' 실행
!                             로컬 쉘로 가기
?                             해당 도움말 텍스트 표시
sftp> ls -l
...
-rw-r--r--    0 0        0         1048576  sftptest
...
sftp> get sftptest
/root/sftptest을(를) tftptest(으)로 불러오는 중입니다.
sftp> exit
root@wl ~ #
ssh-keyscan [-v46] [-p port] [-T timeout] [-t type] [-f file] [-] [host... | addrlist namelist] [...]
root@wl ~ # ssh-keyscan -t rsa,dsa 192.168.0.90,192.168.0.91
# 192.168.0.91 SSH-2.0-Sun_SSH_2.2
192.168.0.90,192.168.0.91 ssh-dss xxxxx...
# 192.168.0.91 SSH-2.0-Sun_SSH_2.2
192.168.0.90,192.168.0.91 ssh-rsa xxxxx...
출력형식은
~/.ssh/known_hosts의 형식과 동일하다. 스캔한 값을 이 파일로 저장해도 되지만, 수집한 공개키를 확인 없이 승인하는 것은 문제가 될 소지가 있으니 주의해야 한다.
클라이언트한다고 가정했다. wl에서 wl2로 접속할 때 공개키를 사용해 인증 하려면,wl에서 서버wl2에 공개키를 사용해 접속
wl에서 개인키(Private Key)와 공개키를 생성하고, wl2에 공개키를 복사한후 설정해줘야 한다.root@wl ~ # ssh-keygen -t dsa -b 1024 공개/전용 dsa 키 쌍 생성중. 키를 저장할 파일을 입력하십시오. (/root/.ssh/id_dsa): 디렉토리 '/root/.ssh'를 만들었음. passphrase 입력 (passphrase가 없을 경우 비어 있음): ***** 동일한 passphrase를 다시 입력하십시오: ***** 귀하의 ID가 /root/.ssh/id_dsa에 저장되었습니다. 귀하의 공개 키가 /root/.ssh/id_dsa.pub에 저장되었습니다. 키 지문: f0:ce:f9:e9:84:a8:e2:3d:5f:f9:1c:7b:22:78:5e:b7 root@wl root@wl ~ # ls -al ~/.ssh -rw------- 1 root root 744 11월 8일 22:41 id_dsa -rw-r--r-- 1 root root 597 11월 8일 22:41 id_dsa.pub root@wl ~ #위와 같이 하면 두개의 파일이 생성된다. id_dsa는 개인키, id_dsa.pub는 공개키를 담은 파일이다.
-t는 암호화 방식을 나타내며 dsa외에 rsa를 선택할 수 있다.
-b이후의 숫자는 키 페어의 비트(기본값은 1024)를 나타낸다.
root@wl2 ~ # ls -al id_dsa.pub
-rw-r--r--   1 root     root         597 11월  8일  22:46 id_dsa.pub
root@wl2 ~ # mkdir ~/.ssh/
root@wl2 ~ # mv id_dsa.pub ~/.ssh/authorized_keys 1)
root@wl2 ~ # vi /etc/ssh/sshd_config 2)
RSAAuthentication yes
root@wl2 ~ # svcadm restart ssh 2)
1) 공개키 파일을 별도로 지정하지 않았으면
~/.ssh/authorized_keys파일을 읽도록 세팅되어있다. 바꿔 말하면 기본 설정으로는 시스템에 있는 사용자마다 각각 authorized_keys 파일을 설정해야 한다는 의미다. authorized_keys 파일을 열어보면 한줄로된 텍스트 파일인데, wl 이외의 곳에서도 wl2에 공개키를 이용해 접속하려면, authorized_keys 파일에 한줄씩 덧붙여 주면 된다./etc/ssh/sshd_config에서 RSAAuthentication이 yes로 되어있는지 확인한다. yes가 아니면 yes로 바꾸고 sshd를 재시작한다. (솔라리스에서는 yes가 기본값이다)
root@wl ~ # ssh wl2
'/root/.ssh/id_dsa' 키에 대한 암호문을 입력하십시오. *****
Last login: Sun Nov  8 22:53:55 2009 from wl
Sun Microsystems Inc.   SunOS 5.10      Generic January 2005
root@wl2 ~ #
root@wl ~ # ssh-agent $SHELL 1)
root@wl ~ # ssh-add ~/.ssh/id_dsa 2)
/root/.ssh/id_dsa에 대한 암호문을 입력하십시오. *****
ID 추가: /root/.ssh/id_dsa (/root/.ssh/id_dsa)
root@wl ~ # ssh wl2
Last login: Sun Nov  8 22:56:34 2009 from wl
Sun Microsystems Inc.   SunOS 5.10      Generic January 2005
root@wl2 ~ #
1) 이렇게 하면 셸을 한번 더 실행하게 된다.
eval `ssh-agent`도 하나의 방법이지만, 이경우 로그아웃 해도 ssh-agent(1)가 그대로 띄워져 있다. (eval을 이용하는 경우 로그아웃 스크립트에 eval `ssh-agent -k`을 사용하면 된다) 단순히 ssh-agent명령만 주면 아래와 같이 환경변수와 에이전트의 PID를 알려주는 스크립트를 출력한다.
root@wl ~ # ssh-agent
SSH_AUTH_SOCK=/tmp/ssh-oHMhD763/agent.763; export SSH_AUTH_SOCK;
SSH_AGENT_PID=764; export SSH_AGENT_PID;
echo 에이전트 pid 764;
root@wl ~ #
2) 만약 id_dsa 파일의 권한을 600 으로 설정하지 않았다면, 아래와 같은 메시지가 나오면서 키가 입력되지 않는다.
@@@@@@@@@@@@@@@@@@@@@@@@@@@@@@@@@@@@@@@@@@@@@@@@@@@@@@@@@@@
@         경고: 보호되지 않는 개인 키 파일!               @
@@@@@@@@@@@@@@@@@@@@@@@@@@@@@@@@@@@@@@@@@@@@@@@@@@@@@@@@@@@
'id_dsa'에 대한 0644 권한이 너무 개방되어 있습니다.
root@wl ~ # vi ~/.profile
...
if [ -f ~/.ssh/id_dsa -o -f ~/.ssh/id_rsa ]; then
	eval `/usr/bin/ssh-agent`
	/usr/bin/ssh-add
fi
root@wl ~ # vi ~/.bash_logout
if [ "$SSH_AGENT_PID" != "" ]; then
	LANG=C; eval `/usr/bin/ssh-agent -k`
fi
root@wl ~ #
다음과 같이 wl 호스트에서 wl2 호스트를 경유해 wl3 호스트에 접속하는 상황을 가정해 보자.
wl ←───→ wl2 ←───→ wl3
wl을 통해 wl2에 접속하고 다시 wl2에서 wl3에 접속하는 상황을 가정해 보자. 이 경우 인증서를 이용해 접속하려면 wl과 wl2에서 키를 생성하고, wl의 공개키를 wl2에, wl2의 키를 wl3에 복사하고 설정해줘야 한다. 또한 wl2에 접속한 후 다시 ssh-agent를 실행해야 한다. 이런 불편함을 해소하기 위해 Agent Forwarding을 사용하자.
아래의 예제를 따라하기 전에 wl의 공개키를 wl2와 wl3에 등록한다. (~/.ssh/authorized_keys에 복사해놓는다)
root@wl ~ # vi /etc/ssh/ssh_config 1)
ForwardAgent yes
root@wl ~ # ssh wl2
Last login: Sun Nov  8 23:29:10 2009 from wl
Sun Microsystems Inc.   SunOS 5.10      Generic January 2005
root@wl2 ~ # ssh wl3
Last login: Sun Nov  8 23:29:13 2009 from wl
Sun Microsystems Inc.   SunOS 5.10      Generic January 2005
root@wl3 ~ #
1) 클라이언트에 Agent Forwarding 을 활성화 해놓는다.
~/.ssh/known_hosts파일에 서버의 키가 저장되어있게 된다.root@wl ~ # vi /etc/ssh/ssh_config Host *.solanara.net HostbasedAuthentication yes EnableSSHKeysign yes
root@wl2 ~ # vi /etc/shosts.equiv 1)
client1.example.org
192.0.2.102
client8.example.org -bull
@statcluster
wl
root@wl2 ~ # ssh-keyscan -t rsa wl >> /etc/ssh/ssh_known_hosts 2)
root@wl2 ~ # vi /etc/ssh/sshd_config 3)
HostbasedAuthentication yes
root@wl2 ~ # svcadm restart ssh 3)
1) rhosts.equiv 이기도 한다.
root@host ~ # vi /etc/ssh/sshd_config
AllowTcpForwarding yes
GatewayPorts yes 1)
root@host ~ # svcadm restart ssh
1) 어떠한 호스트로도 포워딩 가능. no로 설정하면 로컬호스트의 특정 포트로만 포워딩 가능 (즉
no로 설정하면 ssh(1)에서 하단에 설명할
-R, -L옵션의 protnum:hostname:portnum에서 hostname이
localhost만 가능해진다는 뜻이다)
-L 옵션을 붙여 실행하는 것으로 가능해진다.
root@client ~ # ssh -L 1234:localhost:80 username@remotehost 1)
Password:
1) client에 포트 1234를 열고, 이 포트로 오는 모든 트래픽은 SSH에 의해 암호화되어 remotehost로 전송되며, 다시 remotehost입장에서 localhost의 포트 80번으로 포워딩된다. usernmae과 Password는 remotehost의 것을 입력해야 한다. SSH에 접속 한 동안만 포워딩 된다.
root@client ~ # ssh -R 1234:localhost:23 username@remotehost 1)
Password:
1) remotehost에 포트 1234를 열고, 이 포트로 오는 모든 트래픽은 SSH에 의해 암호화되어 client로 전송되며, 다시 client 입장에서 localhost의 23번 포트로 포워딩 된다. usernmae과 Password는 remotehost의 것을 입력해야 한다. SSH에 접속 한 동안만 포워딩 된다.
SSH의 X11 Forwarding
을 사용해 원격의 X윈도 패킷을 로컬의 X윈도로 쉽게 포워딩할 수 있다.
root@sshdserver ~ # vi /etc/ssh/sshd_config 1)
X11Forwarding    yes
X11DisplayOffset  10
X11UseLocalhost  yes
root@sshdserver ~ # svcadm restart ssh
1) 설정을 확인해본다. 이미 되어있다면 수정할 필요 없다.root@client ~ # ssh -X username@sshdserver 1) 암호: Last login: Mon Apr 13 09:00:00 2009 from 192.168.0.x 2) Sun Microsystems Inc. SunOS 5.10 Generic January 2005 root@sshdserver ~ # xclock & 3) [xxxx] root@sshdserver ~ #1) -X 옵션을 주면 된다.
DISPLAY환경변수를 설정하면 안된다.client호스트의 X윈도우에 sshdserver호스트에서 실행한 시계가 뜨면 정상적으로 접속된 것이다.
【Client】←───인터넷───→【SSHDServer】←─→【Appserver】
    │                                  │
    └────────────방화벽에의해차단됨─────────────┘
root@client ~ # ssh -L x:appserver:y username@sshdserver
Password:
root@sshdserver ~ #

client에서 다른 세션으로 아래와 같이 접속한다.
root@client ~ # telnet localhost x 1)
1) 만약 아래와 같은 오류가 난다면, sshdserver의
sshd_config설정을 확인해본다.channel n: open failed: administratively prohibited: open failed → sshd_config의 AllowTcpForwarding설정 확인channel n: open failed: connect failed: connection refused → sshd_config의 GatewayPorts설정 확인sshd_config파일의 AllowTcpForwarding, GatewayPorts옵션을 yes로 설정)을 해줘야 한다.
root@client ~ # ssh -D 1234 username@sshdserver 1)
Password:
root@sshserver ~ #
1) client서버에 1234포트를 열고 이 포트로 SOCKS 프로토콜과 호환되는 데이터가 전송되면, SOCKS 데이터를 sshdserver로 전송해, sshdserver에서 SOCKS 규격에 맞춰 데이터를 처리한다.
설정 → 일반 → 네트워크설정을 선택하면 나온다.
| RSS ATOM XHTML 5 CSS3 |
Copyright © 2004-2026 Jo HoSeok. All rights reserved. |